Tcrt5000 arduino

Introduction to the TCRT5000 Sensor and Arduino
In the realm of electronics and robotics, the TCRT5000 sensor stands out as a crucial component for distance detection and line following applications. This versatile sensor, when coupled with the Arduino platform, unleashes a world of possibilities for hobbyists, educators, and professionals alike. In this detailed guide, we will delve into the technical aspects of the TCRT5000 sensor, its integration with Arduino, and provide practical examples to demonstrate its wide range of applications.
Understanding the TCRT5000 Sensor
The TCRT5000 sensor is an infrared reflective sensor which includes an infrared emitter and phototransistor in a leaded package that blocks visible light. It operates by emitting infrared light and detecting the intensity of the reflection. This characteristic makes it ideal for line tracking and object detection in robotics.
Technical Specifications
- Operating Voltage: 3.3V to 5V
- Detection Range: 2mm to 10mm
- Output Type: Analog
Arduino Basics and Compatibility
Arduino is a renowned open-source electronics platform based on easy-to-use hardware and software. Its boards are capable of reading inputs – light on a sensor, a finger on a button, or a Twitter message – and turning it into an output – activating a motor, turning on an LED, publishing something online. The TCRT5000 sensor is fully compatible with various Arduino models, making it a highly adaptable choice for numerous projects.
Arduino Models for TCRT5000 Integration
- Arduino Uno
- Arduino Mega
- Arduino Nano
- Arduino Leonardo
Wiring and Connection Guide
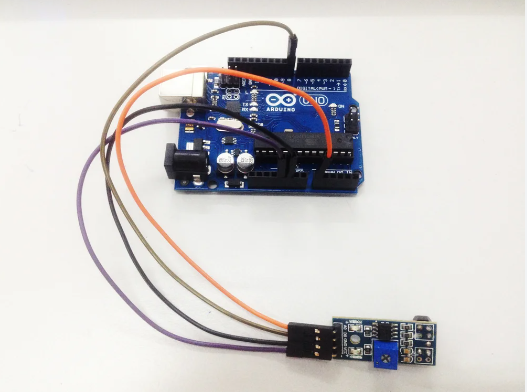
To integrate the TCRT5000 with an Arduino board, a proper connection is crucial. Here is a simple guide to get you started:
Components Required
- 1 x TCRT5000 sensor
- 1 x Arduino board
- Jumper wires
- Breadboard (optional)
Connection Steps
- Connect the VCC of TCRT5000 to 5V on Arduino.
- Link GND of the sensor to the GND on the Arduino.
- Connect the analog output (A0) of TCRT5000 to an analog input on the Arduino.
Programming the Arduino for TCRT5000
Once the hardware setup is complete, programming the Arduino is the next step. This involves writing a code to read the sensor data and convert it into a useful form.
Sample Code Snippet
const int sensorPin = A0; // TCRT5000 connected to analog pin A0
int sensorValue = 0; // variable to store the sensor valueSerial.begin(9600); // initialize serial communication at 9600 bits per second
}
void loop() {
sensorValue = analogRead(sensorPin); // read the value from the sensor
Serial.println(sensorValue);// print out the value you read
delay(100); // delay in between reads for stability
}This code reads the sensor value from the TCRT5000 and prints it to the Serial Monitor, allowing for real-time monitoring.
Applications of TCRT5000 in Robotics
The TCRT5000 sensor, when used with Arduino, finds extensive applications in robotics. Some of the most popular uses include:
Line Following Robots
These robots use the TCRT5000 to detect and follow a predefined path. The sensor’s ability to differentiate between light and dark surfaces makes it ideal for this application.
Obstacle Avoidance Systems
In obstacle avoidance systems, the TCRT5000 can detect the presence of an obstacle and help the robot to navigate around it.
Distance Measurement
Although primarily a reflective sensor, with some calibration, the TCRT5000 can be used for short-range distance measurements.
Advanced Projects and Integrations
For enthusiasts looking to take their projects to the next level, integrating the TCRT5000 with other sensors and modules can open new avenues. Some ideas include:
Integration with Motor Drivers
Combine the TCRT5000 with motor drivers to create autonomous robots capable of complex movements and pathfinding.
Wireless Control
Integrate with Bluetooth or Wi-Fi modules for wireless control and data monitoring of your TCRT5000-based projects.
Interfacing with LCD Displays
Display sensor readings or project statuses on LCD screens for a more interactive and user-friendly interface.
Troubleshooting Common Issues
Inconsistent Readings
If the sensor provides erratic readings, check for proper wiring and ensure there’s no external infrared interference.
Code Errors
Ensure that the Arduino IDE is updated, and the correct board and port are selected. Double-check your code for syntax errors.
Expanding Your Project’s Capabilities
To further enhance your project, consider adding additional sensors, integrating Wi-Fi or Bluetooth modules for connectivity, or incorporating data logging features.
Conclusion
The integration of the TCRT5000 sensor with Arduino offers a gateway to innovative projects and applications. Its ease of use, combined with Arduino’s flexibility, makes this duo a powerhouse for anyone looking to delve into the world of electronics and programming. Whether you’re a hobbyist, educator, or professional, the potential is limitless.


